Showing posts with label Cakes. Show all posts

4/18/14

Meet Ewenice


Looks a little sleepy, doesn't she?

As children, some of us  grew up with pets, such as cats, dogs and canaries. And then, there was that  kid who preferred less conventional animals like horses, rabbits  and sheep – I was that kid.

From my aunt, who raised sheep and chickens, to an uncle who owned horses, to my godfather who raised rabbits, I was fortunate enough as a kid to have a free, lifetime pass to a menagerie.


For years, I prayed for any of these animals to "follow" me home from school. But now I know that's not possible,  as I no longer go to school . . .
But I  still love my 'pets.'  And I still love cake  And so, I give you,  Ewenice, with her sweet black face.

 I could've dusted off some old lamb cake molds, but chose an 8-nch hemisphere pan to bake this cake.  This way, you too can make her, or any other fluffy critter of your choosing, from any size bowl you like, without the need for special equipment.
The lamb's head was just a cupcake. It was attached by inserting a wooden skewer  into the cupcake and right through the body.

The face was covered in fondant. Ears, hooves and flowers were also fondant.  Buttercream covered the cake, which was piped with a Wilton's 1M pastry tip. But any star or round pastry tip will be fine.


Unfortunately I don't have enough space for all the animals I love. But there will always be enough room for my two cats . . . and other, smaller collections. Enter baby silver cups. Tell me you love them too, or  I'll be disappointed.
This American sterling silver cup with the Peter Rabbit handle (by Saart Brothers Silver Co.) still makes me swoon with delight . . . was that too Stepford-y?

But I digress. If you're baking a cake this Sunday, allow me to put a sway in your Easter basket.  This recipe was slightly adapted by adding the zest of one orange. The cake is fragrant and deliciously moist, with an assertive citrus kick  (Btw, I omitted the orange glaze  because I used my Whipped Buttercream  to cover the cake). 

Found the recipe here: Culinary Concoctions by Peabody.

VANILLA YOGURT CAKE with ORANGE GLAZE

1 2/3 cups all-purpose flour
½ tsp baking powder
¼ tsp baking soda
½ tsp salt
1 egg
1 egg yolk
1 cup granulated sugar
1 vanilla bean, seed scraped out, pod discarded
1 ½ TBSP vanilla extract
7 oz Greek Yogurt
½ cup vegetable oil
Grated zest of one orange
4 TBSP orange juice, divided

Spray two 6 x 3.2 x 3.4 inch loaf pans with baking spray. Or coat with butter and flour.

Preheat oven to 350F.
Using a stand mixer, beat together the egg, egg yolk, and sugar on medium-high speed, until it turns pale yellow, about 3 minutes. Add the vanilla beans, vanilla extract, and oil, beat another minute, until incorporated.

In a medium bowl, sift together the flour, baking powder, baking soda, and salt. Set aside.

With the mixer on low speed, add half the amount of dry ingredients. Then add half the amount of Greek yogurt, and 2 TBSP of the orange juice. Add remaining dry ingredients and followed by the remaining yogurt. Remove from mixer and finish mixing by hand using a spatula until all of the ingredients are fully incorporated.

Pour into prepared pans and bake for 35-40 minutes.

Remove from oven. Using a toothpick or large wooden skewer poke holes into the cake. Using a pastry brush, brush orange juice over hot loaves.
Let cool for 10 minutes and remove from pan. Place on wire rack to finish cooling. When cool, glaze cakes.

Orange Glaze

2 cups sifted powdered sugar
6 TBSP orange juice

Combine together with a whisk. Pour over cakes.


Happy Easter  Friends!


2/6/13

Whipped Buttercream


"It takes a touch of genius to move in the opposite direction."


I'm no Albert Einstein, but I love the quote.  And you could say  I have lived my life blazing my own trail,  so to speak.
 For example,  I  blog only when  inspired. No more, no less. Even, alas, at the risk of losing potential readers.

   And today—with Valentine's Day around the corner—I'm inspired.


And so, I'm blogging about Christmas...


Yes, it is common  knowledge that the sheltering sky moves faster than me.   But truth to tell, I'm here to deliver on a promisethe buttercream  recipe I offered to share, before life got its nose in my business.

  I used the buttercream  to decorate the Christmas gnome. Don't you just love that he's 50% beard?

His imperfect little tree house, with lopsided windows, is just right for the tiny man and his wildlife friendsIt consists of four 6-inch layers, with filling in between. Then, everything is covered with a chocolate version of my buttercream.

I used a decorator's comb for the 'bark' on the tree but a new, wide-tooth comb, or even a fork, will achieve the same effect. 

The gnome is simply a cupcake baked in a mini Wonder Mold pan.

  
 As you can see, this buttercream is made with all butter, so it's not perfectly white. 

I will admit that, during the hot summer months, I  tend to incorporate a little Crisco shortening into the buttercream to give it some stability, and to keep piped flowers from wilting.  Don't judge me.

And please,  don't get me wrong either.  The idea of eating white, vegetable fat makes me queasy too. But consider this, when was the last time you looked forward to gnawing on a solid stick of butter? 

At any rate, this buttercream is simply delicious, with a very light texture, and not cloyingly sweet. Use it to cover a cake, pipe borders and flowers. It's a bit fancy and kind of special.

Submitted  for your approval...


Memories in the Baking Whipped Buttercream

½ cup granulated sugar
½ teaspoon salt
½ cup boiling water
¼ cup meringue powder *
1 pound sifted confectioner's sugar
1½ (3 sticks) cups unsalted butter, room temperature
2 teaspoons pure vanilla extract
½ teaspoon Crème Bouquet, or a few drops of Fiori di Sicilia, optional

Dissolve sugar and salt in the boiling water (I normally do this in the microwave. You could put the sugar, salt and water in a small saucepan, bring it to a boil, then lower the heat and simmer, until sugar is completely dissolved).

 Set sugar mixture aside to cool to room temperature. You can make the syrup ahead of time, and keep at room temperature  for a few days, or refrigerate indefinitely.
 If you decide to refrigerate the syrup, be sure to bring it to room temperature before using.

In a mixer bowl, fitted with a whisk attachment, combine sugar mixture and meringue powder, and beat until soft peaks form.  Gradually add sifted confectioner's sugar and beat until stiff peaks form. You're basically making  stiff Royal Icing.

On low speed, beat in the butter for about 5 minutes, or until fully incorporated. Add the vanilla extract,  and the Crème Bouquet or Fiori di Sicilia, if using. Continue to beat buttercream a few more minutes, until smooth.

Use immediately, or cover well and refrigerate for up to a month. When you're ready to use it, bring buttercream to room temperature and beat  at low speed,  to a light, creamy consistency.  

For the chocolate buttercream:

Gently melt 4 ounces of dark chocolate. Allow chocolate to cool to room temperature.  Beat chocolate into prepared whipped buttercream,  using  the paddle, or wire whisk attachment.
 

 So start practicing the messy art of piping  decorations  on for your Valentine. Yeah, let's go with that.


1/20/12

Yellow Butter Cake


It is said that if you're going to have dessert, portion-controlled servings are the way to go.
I find that logic almost interesting.


Regardless, I gave it a try. And I believe this clever strategy has the potential to work!


I can't  begin to tell you how many of these single-serving cakes I've had this week  plus the strong urge to swing from power lines was undeniable.

However, should my body start to block out the sun, I will have to forgo the experts' advice, and resort to baking mini cupcakes instead...


You'll probably think it prosaic to blog about yellow cake, when you consider the endless times I've declared my love for chocolate cake. But this humble classic takes me back to my childhood. And to all the birthdays this type of cake has made its appearance. Light in texture, not overly sweet, buttery and very comfortable sharing the spotlight with just about any buttercream.

These cupcakes were topped with some fantasy-type flowers, which I'll refer to as   'camellias' because who would gainsay me? Who?
In any case, a fancy swirled top would also be pretty. I will be sharing both, my favorite buttercream, and a  simple way to pipe flowers, in time for Valentine's Day.

Yellow Butter Cake

4 large eggs, room temperature
½ cup heavy cream
¼ cup sour cream
2 teaspoons vanilla extract
2¼ cups sifted cake flour
1½ cups superfine sugar*
2 teaspoons baking powder
¾ teaspoon salt
½ pound (2 sticks) unsalted butter, softened, each stick cut into 8 pieces

Preheat oven to 350°F. Lightly grease two 9-inch pans and line bottoms with parchment paper. Or, line a standard cupcake pan, with cupcake liners. Whisk together eggs, heavy cream, sour cream and vanilla. Remove 1 cup of this mixture and set aside.

Combine cake flour, sugar, baking powder and salt in bowl of standing mixer fitted with paddle attachment. Mix on lowest speed to blend, about 30 seconds. While mixer is still running, add butter, one piece at a time (Make sure to cover mixer bowl with a kitchen towel for the initial mixing, to keep all the ingredients in the bowl instead of your lovely face :).

Mix until butter and flour begin to look  pebbly, with pieces about the size of peas, 30 to 40 seconds after all the butter is added. Add reserved 1 cup egg mixture, mixing on lowest speed until until incorporated, about 10 seconds. Increase speed to medium-high and beat until light and fluffy, about 1 minute.

Add remaining egg mixture  into batter, in slow, steady stream, about 30 seconds. Stop mixer and scrape sides and bottom of the bowl. Beat until well combined, 15 seconds longer

Divide batter equally between pans. Pick up each filled pan a few inches off the counter and drop several times to 'belch' any air bubbles to the top, as well as to evenly level the batter in the pans.

Bake until tops are light golden and wooden skewer inserted in center comes out clean, 20 to 25 minutes. Cool cakes on wire rack 8 to 10 minutes. Run thin metal spatula around pan perimeter to loosen. Invert cake onto parchment-lined wire rack, peel off parchment, and reinvert cake onto parchment paper-lined rack.**  Cool completely before frosting. Adapted from The Best Recipe, by Cook's Illustrated.

*To make your own superfine sugar, process granulated sugar in a food processor or blender for about one minute.

**This cake will level off a bit once it comes out of the oven. If the cake still has a dome after a few minutes of cooling, take a piece of  parchment paper and lay it over the cake. Rest another cake pan over the warm cake, and  press it down, gently. Hold  for 15-20 seconds and release the pressure. If cake still has a dome, repeat the process. This is a  technique commonly used by cake decorators to level most cakes without the need to slice the tops off.


I hope you'll bake this wonderful cake soon. But I'm warning you, you'll need a shower afterward.

Have a good weekend, my friends.

Designs by Gollum
Romantic Home


5/7/11

Flowers for Mom


Did I ever tell you I once had my own personal chef?

My chef would often create dishes with the veritable ease and skill of an Iron Chef, but with few ingredients, and even fewer, fancy gadgets.

I shall refer to her as "Chef Mom," because that is who she was, and still is today.

Sadly though, once mom retired to the state of Florida (as required by law), the pampering stopped. But this is not where the story ends. In the next chapter, you'll see how mom's culinary influence gave me the confidence to return the favor.

So this Mother's Day, I'll be indulging her sweet tooth with a classic dessert, her favorite, Carrot Cake.


No roses on mom's cake — she prefers daisies.

Carrot Cake with Cream Cheese Frosting

2 ½ cups AP flour
1 ¼ teaspoons baking powder
1 teaspoon baking soda
1 ½ teaspoons ground cinnamon
½ teaspoon allspice
¼ teaspoon ground cloves
½ teaspoon salt
1 pound carrots, peeled and finely shredded
1 ½ cups granulated sugar
½ cup packed light brown sugar
4 large eggs, room temperature
1 cup vegetable oil
1 cup chopped walnuts, or pecans

Preheat oven to 350° F. Line 2, 9-inch pans with parchment paper, and grease lightly. Grease and flour a small (3 to 4-inch) ovenproof bowl.

Sift together flour, baking powder, baking soda, cinnamon, allspice, ground cloves and salt. Set aside.

Place eggs and both sugars in a mixer bowl with a wire whisk, and whip them on high, until light and airy, 2 to 3 minutes. Reduce speed to low, and slowly add the oil in a thin stream, until mixture is light in color and emulsified.

Stir in the carrots, walnuts and flour mixture, until incorporated. Pour batter into prepared pans and bake about 40 minutes for the 9-inch pans, and about 20 for the small bowl cake. Cool cakes in their pans 15 minutes, then remove from pans and place on wire racks to cool completely, before frosting.


Cream Cheese Frosting

8 ounces cream cheese, softened
5 tablespoons unsalted butter, softened
1 teaspoon vanilla extract
2 cups confectioner’s sugar
Heavy cream

Using the paddle attachment on your mixer, whip the cream cheese, butter and vanilla until light. Stop mixer to scrape down the sides of the bowl. Add all the confectioner’s sugar and mix on low, until incorporated.
Add just enough heavy cream to create a medium consistency frosting.


You could replicate this simple cake for any Spring or Summer event. If you decide to, you're also going to need 1½ pounds of rolled fondant. I like Satin Ice, but homemade fondant will be just fine.

To decorate: Cover cakes with a thin layer of frosting. Allow frosting to set up. Tint a little of the fondant a mossy green, for the leaves.
Roll out fondant very thin, and cut out as many leaves as you like, to go around the bottom edge of the cake.

Roll out white fondant, and cut the daisy petals with a 3½-inch tear drop or oval-shaped cutter (Keep the fondant covered with plastic wrap while you work, to keep it from drying out).


To vein the petals, place each one onto a dry corn husk, cover with a piece of thin foam, or plastic wrap, and roll over it with an artist's brayer.
Add three thin layers of petals onto the cake, starting just above the leaves, and working your way up. Pinch the petals at the top edge before placing them on the cake.

Tint a small amount of fondant yellow. Roll it out, and cover the small round cake, neatly tucking the ends under. Place it on the flower, as shown. After the fondant has dried, you could brush it with gold petal dust.


So what're you still doing up at this ungodly hour!?

(I suppose you could say my bossy tendencies are yet another trait I inherited from dear ol' mom).

But seriously, go to bed. And don't forget to brush.


I'll be joining Foodie Friday.


Happy Mother's Day to my Foodie Brigade!

2/11/11

I Love You More Than...

Bedtime came late one night, as my daughter Sam, and I, tried to top our love for one another.


Mom: "I love you more than all the South Sea pearls in the world."
Sam: "I love you more than ice cream."
Mom: "I love you more than all the stars in the sky."
Sam: "I love you more than...the septic system!"
Mom: "Wait—What!?"

Needless to say, this nightly ritual came to a screeching halt.

Moments later, the anxiety emanating from Sam's emerald green eyes turned to welcome relief, when, between suppressed giggles, she restored harmony to our universe, by saying,

"Mom! I meant to say, I love you more than (tee hee) the Solar System!"

Breathing a sigh of relief, I realized that, while I will never be perfect, being grouped into the human waste category, had never been one of my three wishes when I signed up for this job.

But that night, between gales of laughter, my precious pearl, Sam, left an indelible mark on my heart. She's all grown-up now. Yet, those carefree, wonderful moments we shared, time will never take away.

In any event, since most of her favorite desserts involve almond paste and chocolate, I dedicate this post to her. I hope you'll share this with the pearl of your life.


These cakes were baked in natural baking shells. If you do not have these, try Madeleine pans.  But try to find the natural shells, as you'll find many uses for them. I've baked everything in them, from brownies, shortbreads and cakes, to cornbread.


The following  recipe is the same I used for the seashell cookies some years ago—weelll, with a few minor changes, which  resulted in an even more pronounced almond flavor, and deliciously moist cakes.


To avoid confusion, I will post the recipe once again, to reflect those changes.


Almond Cakelets

1 cup (8 ounces) almond paste
1 cup sugar
1 cup butter, at room temperature
1 tablespoon vanilla extract
6 large eggs, room temperature
¾ cup AP flour
¾ teaspoon baking powder
¼ teaspoon salt

Preheat oven to 325º F. Grease and flour a 9-inch Springform pan or 16 baking shells*.

Combine the almond paste and sugar in a food processor. Pulse until blended. Add the butter and vanilla; pulse until well combined. Add the eggs, one at a time, and pulse until just combined. Do not over mix.

Sift together the flour, baking powder and salt. Add dry ingredients to the almond mixture and pulse to blend.

Transfer the batter to the prepared pan. Place the pan on a baking sheet and bake for 1 to 1½ hours in the Springform.
If making seashells,  bake  about 15 minutes, or until lightly golden around the edges.

Seashells were completely cooled. Then, lightly brushed with a  basic confectioner's glaze.

*NOTE: If you're left with extra batter, bake a few cupcakes, and freeze them for another time.

I made a sugar rose, and set it by the pearls. Pearls were basic chocolate truffles, covered in white chocolate. Don't hurt me. I just couldn't conceive using black (dark chocolate) pearls for this presentation.
So never fear. I have not converted to the light, fluffy side.


Happy Valentine's Day, my friends. And may Cupid's arrow set your heart aquiver!

12/3/10

A Tuscan Birthday Fare


Thumper's birthday was  weeks ago, but I had to share with you this milestone.
Although, the boy turned 12,  he's almost taller than me. And no longer shops for clothes in the boy's department. Fact is,  he's been recently spotted  wearing "man pants."

So, I was not too surprised when my suggestions for his birthday cake— a Star Wars theme, or perhaps, a Little Big Planet's Sackboy cake—were crushed.

"Mom, I don't want  cake—that's for babies. What I really want is Spaghetti and Meatballs!"

Say what?!

Have I spent all these years frolicking-in-sugar-in-order-to-someday-provide-my-kid-with-a-homemade-birthday-cake-for nothing? (comes up for air).

"Listen, Mister Man Pants, you're getting a cake, whether you like it or not!"

 
Being that my little guy is all grown up now, I honored his birthday wish—somewhat.  I baked him an old favorite  amongst his  peers,  Spaghetti Cake.

The cake was chocolate  (use your favorite chocolate cake recipe, or try this or this one.)
I baked it in an oval-shaped pan. The cake was  crumb-coated with a pale yellow-tinted buttercream. Then, the spaghetti strands were  piped from a #5 pastry tip.

I considered making truffles for the meatballs, but didn't think they'd  look realistic enough. Besides,  most kids  love Rice Krispies Treats, right?  So making  meatballs, using chocolate and rice cereal was a no-brainer.
Cake was garnished with fresh chocolate mint—Amore. The "tomato sauce" was   raspberry sauce.

Incidentally, in case you were wondering,  the wine  was for me—not the child.

Speaking of wine.  What would a traditional Tuscan fare be, without grapes? Which, btw, also happens to be the boy's  favorite fruit.


Well, I could've handed the boy a bunch of grapes, and called it a day.  But I wouldn't have slept through the night, unless I took the  fruit  to another level.
Concord Grape Sorbet was the answer  (Btw, leaves and tendrils were all made of Marzipan).

This frozen treat tastes like the grape juice many of us enjoyed as kids. Remember how it tasted purple?
Oh, you'll need a spoon for this one—or not—if you're a kid at heart.

I froze Concord grapes from last fall  for the occasion. Can't find Concord grapes? Make the sorbet with Concord grape juice. Can't find Concord grape juice? Use grape-flavored water. Can't find water?
...I'm way ahead of you...

Ain't I a stinker?

I'm kidding, of course. I just  think you should try this, sometime.

 Chocolate Rice Krispies Meatballs

3 tablespoons unsalted butter
3 ounces  unsweetened chocolate
1 package (10 oz., about 40) large marshmallows, or, 4 cups miniature  marshmallows
 6 cups Kellog's Rice Krispies cereal

In large saucepan melt butter and chocolate over low heat. Stir often.  Add marshmallows and stir until marshmallows are completely melted. Remove from heat.
Add 6 cups of the rice cereal, stirring  until well coated. Allow mixture to cool  about 10 minutes,  or until  cool enough to handle.  Roll meatballs from the chocolate mixture, using a small, greased,  ice cream scoop. Place ‘meatballs’ on  parchment paper-lined cookie sheet, and set aside until completely set.

 Concord Grape Sorbet

1½ pounds Concord grapes
¼ cup water
Simple syrup (recipe follows)
1½ tablespoons fresh lemon juice
 Prepare an ice bath, set aside. Wash and stem the grapes. Combine grapes  and water in a medium saucepan. Cook over medium-high heat, until the liquid begins to bubble and grapes start releasing their juices, about 5 minutes. Reduce heat, and simmer until grapes begin to break apart, about 3 minutes more.

Pass mixture through a food mill, or fine sieve into a large bowl set in the ice bath; discard solids.
Stir frequently, until completely cool. Stir in the simple syrup and the lemon juice.

Transfer mixture to an ice-cream maker, and freeze according to manufacturer's instructions. Place in an airtight container, and store in freezer until ready to serve, up to 2 weeks. Serves 10.

Simple Sorbet Syrup
Simple syrup can be stored in an airtight container in the refrigerator, for at least 2 months.

2/3 cup sugar
2/3 cup water
In a medium saucepan combine sugar and water. Bring to a boil, over medium-high heat. Cook until sugar completely dissolves, about 8 to10 minutes. Allow to cool, and then, refrigerate until needed. Sorbet recipe, courtesy of Martha Stewart.

Raspberry Sauce

One 10 ounce bag  frozen raspberries
¼ cup granulated sugar
1 teaspoon fresh lemon juice
1 tablespoon Chambord, optional

Bring raspberries, sugar, and lemon juice to a gentle boil. Simmer for 4 to 5 minutes. Remove from heat and add Chambord.
Purée in a blender until smooth. Strain mixture through a fine sieve to remove seeds. Cool completely, and refrigerate until needed. This sauce also freezes well.
_________________________________

And there you have it:

Thumper loves pasta.
Thumper loves meatballs.
Thumper loves Italian cuisine, in general.

So, what was my mercurial son's birthday dinner?

Chinese food.

10/29/10

Happy Halloween, my sweets!

I'd like you to meet my friend, Rick O. Mortis.


Lately, he's been a little lonely—and dare I say—dead on his feet, since he bought the farm. So, I've asked him over...for dinner...
He's mortified at the prospect because he hit a dead-end, deciding what to bring to the fete. Silly stiff.

As you can tell, Rick is pretty down to earth. From his marzipan head to his fungus-y nails. You may think this is arcane, but I cannot wait to eat...er...I mean, meet him.

Mr. Mortis (whose only crime was being born [again] delicious), was molded from rice krispies treats.
If you make this, make sure the krispies treats mixture is cool enough to handle before shaping it into a skull. I usually wait between 8 to 10 minutes before handling the stuff.

For the head, shape the mixture into a rough oval. With your thumbs, make the impression for the eyes. And gently squeeze the head, just below the eyes, until it begins to look like a skull.
Looks a bit like Jay Leno, doesn't he?   Next time, I'll ease up on the chin.


Set the skull aside to dry,  by placing it on a plastic-covered bag of rice,  flour or confectioner's sugar to keep the shape of the head round.
If you skip this step, his head will be flat in back. Which will only make your zombie that much creepier.

In other words, let your fearless creativity flow, and quit hanging on to my every word!
Okay then. This is optional, but, color your marzipan with a few tablespoons of baking cocoa for that freshly-dug effect.   Roll out the marzipan, and drape it over the head. Quickly mold it to the shape of the head.
If it tears a bit, rejoice! 

Or, you could always patch it up—but not too much—because smooth, flawless skin is hardly prevalent with today's modern zombie.

Blood is piping gel,  tinted red.
From here on out, do as you please. Add as many, or as few, wrinkles, and teeth, as you dare.

The hair is Asian rice noodles, simply inserted into the skull, while marzipan is still soft and malleable.
Btw, remember to  lightly drape the areas you're not working on with plastic wrap, to keep marzipan from drying out, while you work.

The fingers were shaped freehand  into sausages,  again,  from marzipan. Pistachio halves were used for the nails. I wanted him pushing up daisies, but all I had were Brown-Eyed Susans,  which I made in sugar years ago. Somehow, the  Brown-Eyed Susans  seem  less morbid.  This suits my  friend Rick just fine. After all,  he's kind of an earthy,  happy-go-lucky zombie.  And you're jealous.


And just so you don't think I'm all about doom, gloom and despair, I present to you  this benign little witch, Evilene.


Evilene consists of three Jack be Little pumpkins, supported by toothpicks. She was then tarted up with a cute, sheet music hat.
The broom was haphazardly put together with a bunch of fresh thyme, tied to an artist's paint brush with twine. Easy, right? 

Well, my dear goblins, it is time for me to depart.

May you all rest in (Reese's) pieces this Halloween.

Regards,

Bad Brew Betty

4/22/10

Lemon Curd Marbled Cheesecake


Well, I just finished 1½ hours on the treadmill
. Oops. Typo. I meant, I just finished half a cheesecake for lunch.
I developed a craving for a simple lemony dessert, something befitting my simple tastes. And on a fickle whim, I went with Lemon Curd.

Then, Thumper upped the ante by claiming I hadn't made his favorite cheesecake "in like, forever." And the idea for a cheesecake, infiltrated with amorphous blobs of lemon curd was born. Far be it from me to impugn his request...


I  cut out individual servings  from the chilled 9-inch cheesecake with a biscuit cutter,  in the hopes that  no temptation would befall my diet, and overall good intentions.  Is my sarcasm showing?

By the way, the (botanically-incorrect) hyacinth on the plate was made by rolling fondant into an egg shape, if you will. Next, the stem and leaves were added. Then I cut out gazillions of tiny flowers and glued them onto the fondant egg with a paste made from Gum Arabic.
(If you're convulsing in your chair  because you don't know what the hell kind of thing I speak of, then forget about  the Gum Arabic,  and use Royal icing instead).

Actual size not shown.


Lemon Curd Marbled Cheesecake with Blueberry Sauce

Crust:

2 cups all-purpose flour
¼ cup  packed light brown sugar
1 teaspoon vanilla extract
Pinch salt
14 tablespoons  unsalted butter, diced

Lemon Curd:

4 large egg yolks
½ cup + 2 tablespoons sugar
3 ounces lemon juice
4 tablespoons (2 oz) unsalted butter, softened
Pinch  salt

Filling:

1 pound cream cheese, softened
¾ cup sugar
½ cup sour cream
3 large eggs, room temperature
1½ teaspoons vanilla extract

Blueberry Sauce:

1 pint fresh blueberries
¼  cup  sugar
2 tablespoons water
2 teaspoons fresh lemon juice


Preparation

Crust: Preheat the oven to 350°F. Combine flour, sugar and salt in the bowl of a food processor. Add the butter and vanilla extract, and process until a dough forms. Press the dough into a 9-inch Springform pan and bake 10 to 15 minutes, or until it just begins to turn color.  Remove from the oven and allow to cool.

Lemon Curd:
In a heavy  saucepan, beat the  egg yolks and sugar until blended. Stir in the remaining ingredients. Cook over medium-low heat, stirring constantly, until it thickens and coats the back of a spoon. Don’t allow the mixture to boil or it will curdle.  Press a piece of wax paper right on the lemon curd, to prevent a crust from forming, and  set aside to cool. (If  lemon curd will not be used right away, cool completely, and then, store in an airtight container in the refrigerator for 2 to 3 weeks).

Filling:
Combine  softened cream cheese, sour cream and sugar in the bowl of a food processor, and process until smooth. Add the eggs and vanilla extract and process  until incorporated.
Pour half  of  the filling mixture in the prepared crust.  Spoon half the lemon curd onto the filling. With a knife,  swirl lemon curd through filling, taking care not to disturb the bottom crust. Repeat with the remaining cheesecake filling and lemon curd.
Bake in a 350° F oven until set, about 45 minutes. The  center should still jiggle when gently shaken.  Run a knife around the sides of the pan to loosen, and allow  to cool, about 1 hour. Refrigerate uncovered cheesecake  for several hours. Then, cover with plastic wrap and refrigerate  overnight.


Blueberry Sauce:
In a medium saucepan combine all ingredients and cook until   blueberries begin to break down and the sauce is slightly  thickened, about 10 minutes. Serve warm or at room temperature.


Enjoy. For tomorrow, some of us will recite  three hail Marys, followed by a strict diet...for the rest of us, there's always next Monday.

4/2/10

White on White Buttermilk Cake with Jack Daniel's Buttercream


This time of year I tend to reminisce about my childhood friend, Caridad (I called her Cari), who used to push me fierce hard, and even dared to  wake me up at an ungodly hour, every Sunday morning,  to drag my heathen carcass to church.

“C’mon, I know you’re in there! I’m not leaving until you open the door!” Cari demanded. 

One thing about Cari, she was no quitter.

I would ceremoniously wait 10 minutes, before answering the door, allowing myself ample time to fabricate another  alibi, in order to stay in bed...if I played my cards right.

 Once, desperation led me to blurt out that I had come down with  Beriberi. An open-and-shut case, I thought. 
There was a long, awkward pause, as it became glaringly-obvious that Cari wasn't biting.
Look, I was 10 years old  at the time.  It didn’t seem wildly absurd then.

 And, as luck would have it,  Cari was  a few years older—and wiser—than me. But,  she meant well, so  I will never forget the  kind, thoughtful, and punctually-persistent little twerp that she was.
Besides,  it was her  persuasiveness that  often  led me to pray,  and selfishly implore…“Please, make Cari take a hike, and relieve me of my suffering.”

What does any of this have to do with a baking blog? Not a blessed thing.
But I’m doing the Bunny Hop because now that I’m  (allegedly)  an adult, I’ve taken back Sunday.

 And here is a cute birdhouse cake I made for Easter Sunday.   This Buttermilk Cake is light, both in texture and in color, it's also  very moist, and pairs well with an array of  buttercreams, but  a simple  glaze would be just as good.
This cake is unparalleled served buck-naked, with fresh, summer berries.


White on White Buttermilk Cake with Jack Daniel’s Buttercream
Yield: 12 to 14 servings

1½  cups (3 sticks) unsalted butter, room temperature
2 1/3 cups sugar
3 large egg whites
2 teaspoons vanilla extract
3 cups cake flour
¾ teaspoon baking soda
¾ teaspoon salt
1½ teaspoons baking powder
1 ½ cups buttermilk

Place baking rack one-third from the bottom of the oven, and the second two-thirds from the bottom. Preheat oven to 350°F. Line three 9-inch cake pans with parchment paper, and lightly grease.
Using a mixer with a paddle attachment, beat butter and sugar in a large bowl on medium speed about 2 minutes, until light and fluffy. Scrape down the sides of the bowl. Beat in the egg whites and vanilla, about 1 minute.
Combine cake flour, baking soda, salt, and baking powder in a medium bowl. Add  one-third of the flour mixture to the batter and beat on medium speed until incorporated. Add about half of the buttermilk and beat on medium speed until incorporated. Continue adding dry and wet ingredients alternately, scraping the bowl down and beating until incorporated after each addition. End with the dry ingredients.
Pour the batter evenly into the cake pans. Stagger the pans on the oven racks so that no layer is directly over another. Set two layers on one rack and the third on the other. Bake  25 to 35 minutes, until a toothpick inserted in the center comes out clean. Monitor the cakes for doneness; each one may be done at a different time.

Cool the cake pans on wire racks  for 10 minutes. Invert the cakes onto the racks and cool completely before frosting.  At this point,  the cakes can be  wrapped in plastic, and a layer of aluminum foil and frozen up to 3 weeks.


Jack Daniel’s Buttercream

Using a mixer fitted with a whisk attachment, whip the eggs and yolks in a large bowl on high speed about 5 minutes. In a medium saucepan, combine the water and sugar; simmer until it reaches the soft-ball stage, registering between 234-f degrees and 240-f degrees on a candy thermometer. Immediately transfer the syrup to a large heatproof liquid measuring cup.
In a slow, thin stream, add the sugar mixture to the egg mixture, mixing on low speed the entire time. Increase the speed to medium and beat about 7 minutes, until the syrup has cooled (the bowl should be barely warm to the touch). Add the butter, half a stick at a time, beating on medium speed about 20 seconds after each addition. Once all of the butter has been added, beat on medium until the frosting thickens slightly, about 3 minutes. Stir in the salt and whiskey.

Place 1 cake layer on a serving plate and spread a thick blanket of frosting on top. Add the second layer and spread with frosting. Add the third layer and cover the top and sides of the cake with an even layer of frosting. The cake will keep several days at room temperature.

Variations: Grand Marnier or Amaretto can be substituted for the Jack Daniel’s in the buttercream.  For chocolate buttercream, substitute 8 oz. of melted bittersweet chocolate for the Jack Daniel's. Make sure to cool the  chocolate  at least 15 minutes before adding it to the buttercream. The Pastry Queen, by Rebecca Rather.

The birdhouse cake was slightly carved and tapered toward the bottom. Because I used three layers I inserted a wooden rod right through to the bottom of the cake to keep it stable while frosting it. The large marshmallow helped anchor the flower.


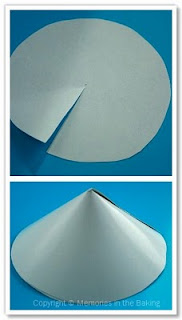
The large Bluebell is made of sugar. Petals were cut rather thick and rolled out very thinly, to wrap around a large paper cone (see below). Remember the paper hats you made in Kindergarten? Same principle applies here. Make sure to cover the cone with plastic wrap, and dust it liberally with cornstarch to keep the flower from sticking. Allow to dry overnight.


Well, Easter is just two shakes of a bunny’s tail away, and I want to wish my homebunnies  a very wonderful day!

2/12/10

Clementine Cake


At first I was afraid, I was petrified...when I learned of Nigella Lawson’s Clementine Cake, via the singing praises of her many fans.
To me, the idea of combining five, whole clementines with almond flour, seemed like a recipe for disaster.

The many hurrays (with only a few harrumphs) garnered by this cake over the years, finally convinced me to try it.

It was, with Open Arms, that I followed the lead of two culinary giants, Nigella Lawson, and Pierre Hermé, to create a festival of flavors in one dessert, lovingly concocted for the Wind Beneath my Wings.

Nigella’s book, How to Eat, describes this cake as "an easy to make, wonderfully-damp and aromatic flourless cake."
Hey, Two Out of Three Ain’t Bad.


The First Time I baked this cake, it turned out rather boring, unlike its lovely creator. Suspecting error on my part, I tried baking the cake again.
Surely a glug of Grand Marnier, a drape of chocolate ganache, and a supporting cast of delicately-crisp orange tuiles would be Almost Paradise.

Well, sadly, the cake never lived up to its superlatives. It was heavy, with a soggy texture, and it still lacked in flavor. A Total Eclipse of the Heart.

Btw, the reason I'm not including the recipe is because friends don't let other friends waste a perfectly good clementine. Not to mention, the recipe is all over the internet.

On the other hand, the Orange Tuiles from My Boo, Pierre Hermé, were light, citrus-y confections.


Only downside, the tuiles spread too much in the oven. And what started out as heart-shaped tuiles, emerged from the oven resembling the state of Mis . . . Mississip . . . Texas.

So, I had this brain flash to spread the tuile batter onto a parchment-lined baking sheet, and use a heart-shaped cookie cutter to cut out the tuiles as they came out of the oven.
Success! But I had to work quickly, while the tuiles were HOT! Ouch. Let me tell you, it was More Than a Feeling.

But, I Will Survive...

This experience was just a minute failure. And, for the record, I still love Nigella and Pierre. And I Would Do Anything For Love. But I Won't Do That . . .again.

The silver lining? This whimsical frog prince. He started with about 4 ounces of tinted marzipan. The body weighed almost 3 ounces, which left enough marzipan for the legs, feet and eyes.


Shape the largest piece into an oval for the body. Then gently roll the neck as shown, and prop the head on a sponge roller, for about 1 hour, to help maintain that pose.
Divide remaining marzipan (2 for the hind legs, 2 for the webbed feet, 2 for the front legs, and 2 for the eyes). Roll the two largest pieces into 2-inch long sausages, for the hind legs. Fold in half as pictured. Make the webbed feet, and front legs with the leftover marzipan.
With a wooden skewer, mark the nostrils. Attach all the pieces with edible glue made from Gum Arabic and a few drops of water. A mixture of powdered egg whites and water will work as well.

The crown was just a thin strip of gum paste, wrapped around my index finger, ends overlapped and glued. Painted gold using Gold Petal Dust, and a few drops of clear alcohol (gin, vodka, tequila), or lemon extract.


May your Valentine's Day be filled with chocolate, and favorite love songs.

1/15/10

I'm Seeing Red!

For those of you braving arctic temperatures, come right in and sit by the fire. How about a slice of cake, still warm from the oven—it is to live for!
Tea, perhaps?


For those of you living in a warm climate, get your dirty paws off the cake and get the hell out! And take your dark tan and flip flops with you too!


...well, if it looks like somebody woke up on the wrong side of the broom, it is because somebody did. It's that Old Man Winter again, having a negative effect on my alter ego. I think I she, should have some cake too.

And look, not even our normally placid Puddin' has been able to contain her displeasure. Smacking poor Louie, then drifting back to sleep, with the clear conscience of a cat.


So, it is with a bit of urgency that I contribute this wonderful little cake, notorious for putting a smile on all who try it.
The recipe evinces simple ingredients, harmoniously mingled together, to create a veritable masterpiece of flavors and textures. You'll be making this cake more than once. Yes, you will.

I know this, because it was voted Best in the Hemisphere by Thumper. And you all know how finicky he is. Never mind he has no idea what "hemisphere" means.

And so it is, with the approval of my adorable, little tax deduction, that I share this recipe with you.


Wintertime Cranberry and Orange Cake

Cranberry Filling:

12 oz. bag of fresh cranberries, picked over and rinsed
½ cup granulated sugar

Sponge Cake:

1¼ cups AP flour
1¾ teaspoons baking powder
¼ teaspoon salt
1¼ cups granulated sugar
¼ cup (½ stick) unsalted butter, melted and slightly cooled
2 large eggs, beaten
1/3 cup heavy cream
Grated zest of 1 orange
1 teaspoon vanilla extract

Topping:

1/3 cup sliced almonds
¼ cup granulated sugar

Preheat oven to 325°F. Grease an 8” Springform pan, dust the sides with granulated sugar, and line the bottom with parchment.

In a medium saucepan, heat the cranberries and sugar over medium heat. Stirring frequently, until the sugar dissolves and cranberries pop, about 15 minutes. Set aside to cool.

In a large mixing bowl, stir together the flour, 1¼ cups sugar, and baking powder.
Whisk in the melted butter, eggs, heavy cream, orange zest and vanilla in the same saucepan you melted the butter in. Stir into the dry ingredients until well combined.

Spread half the cake batter into the prepared pan. Spread the cranberry filling over the batter (don't let the cranberry filling touch the edge of the pan, or it will stick). Spread the remaining batter over the cranberries, and sprinkle evenly with the sliced almonds and remaining ¼ sugar.

Bake the cake until golden on top, about 1 hour. Let cool in the pan, about 10 minutes. Run a knife around the cake and release the sides of the Springform pan. Serve warm or at room temperature. Adapted from All American Desserts, by Judith M. Fertig.

Note: Did you know you can crystallize more than just fruits? Herbs, like rosemary, mint, and even bay leaves lend themselves to this simple technique. It's what I used on the frosty trim on the cake above, and the glass cloche below.
Start by whisking 1 tablespoon powdered egg whites with 2 tablespoons warm water. Brush egg white mixture to clean and dried herbs. Sprinkle with granulated sugar and set the herbs on parchment to dry. You could also add edible glitter to the sugar for a little extra sparkle.


And since we're crusading for World Peace, we might as well use up the rest of the cranberries, by making my favorite scones.


Excellent made with cranberries, red currants, and, of course, chocolate!


The ingredients are typical for scones. What is atypical is the technique, which consists of beating the heavy cream into soft peaks, making these scones featherlight, buttery, outstanding...and good too!


Cranberry Cream Scones

2 cups AP flour, plus more for dusting
1/3 cup sugar
3 teaspoons baking powder
¼ teaspoon salt
½ cup fresh cranberries
1 1/3 cups heavy cream
1 tablespoon melted butter
1 tablespoon granulated sugar*

Position the oven rack in the lower third of the oven. Preheat oven to 375°F.
Sift together flour, sugar, baking powder and salt. Mix the cranberries into the flour mixture.

Whip the heavy cream in a bowl until soft peaks form.

Fold the whipped cream into the dry ingredients, just until it forms a semi-cohesive mass.
Transfer the dough to a lightly floured surface and knead gently, a few times, until the dough holds together. With your hands, pat the dough into an 8-inch circle on a lined baking sheet. Brush scones with the butter and sprinkle with granulated sugar*

Cut circle into 10 wedges, without detaching them. And bake for 30-35 minutes or until golden. Cut into the pre-marked wedges after they're baked.

*This time I topped the scones with turbinado sugar.

By the way, if you'd rather make smaller scones, divide the doughy massacre in half, and pat each half into a circle. Proceed as above.


If this last photo of cranberry scones raised an eyebrow of suspicion, you've been paying attention. They're not cranberries, but red currants in them scones.

Warm wishes to my blogging brigade!

Broom-Hilda