Showing posts with label Chocolate. Show all posts

3/16/18

Chocolate Sorbet

Hello, friends,

I can't tell you  how a simple concoction, such as this,  turns into a creamy and decadent chocolate sorbet.  I simply cannot.

Obviously,  some sort of alchemy takes place when basic ingredients, e.g.,  chocolate, water, and sugar are combined,  resulting in the ultimate chocoholic's dream.

What I can tell you is, you need to experience it for yourself. Today. And when you do, please, explain it to me. Go ahead, I'll wait . . .


Chocolate  Sorbet

1 quart water
1¼ cups granulated sugar
1 teaspoon instant espresso powder (I like Medaglia D'oro)
½ cup unsweetened cocoa powder
10 ounces bittersweet  chocolate, chopped 
1 tablespoon vanilla extract

In a large saucepan, bring water, sugar, espresso powder, and cocoa powder to a boil, and boil for 5 minutes. Remove from heat. 

Add the chocolate,  and whisk to combine and thoroughly melt the chocolate.  Then, stir in the vanilla.  Transfer mixture to a heatproof bowl, cover and refrigerate overnight.

Freeze in an ice cream maker, according to  manufacturer's instructions.   Makes about 2 quarts.
Adapted from La Maison du Chocolat by Robert Linxe.


3/9/11

Brown Sugar Chocolate Chip Cookies


National Chocolate Chip Cookie Week is upon us. And according to Mr. Man Pants, this ought be a weekly series, rather than a yearly event.
If your views are consonant with his, then you might as well take advantage of the celebration, for May is National Salad Month.
...who called me a Killjoy?


You know, if I weren't afraid of Mrs. Fields declaring me an endangered species, I would probably confess to you that I've never been a huge fan of CC cookies—no matter how awesome—so instead, I'll keep my mouth shut.


Cow extract and chocolate chip cookies go well together, so serve it with a tall glass.

Speaking of milk, did you know it takes 345 squirts from Bessie's udder to make one gallon of milk? I'd be curious to meet the Adonis who gets paid to run these studies.


In any event, here is my family's favorite CC cookie recipe. This is a rich, chewy, full of chocolate chunks cookie, with a generous pinch of Oh.My.God.


Brown Sugar Chocolate Chip Cookies
Makes 4 dozen cookies.

2½ cups AP flour
1 teaspoon baking soda
1 teaspoon salt
1 cup (2 sticks) unsalted butter, room temperature
2 cups light brown sugar, packed
2 large eggs
1 tablespoon vanilla extract
2 cups semisweet chocolate chunks, or chocolate chips
1 cup chopped walnuts

Preheat oven to 350°F.
Line sheet pans with parchment paper.
In a small bowl, whisk together the flour, baking soda and salt. Set aside.
Using a mixer with a paddle attachment, cream the butter and sugar until light, 5 to 7 minutes. Add the eggs, one at a time, beating well after each addition. Beat in vanilla.
On low speed, add the flour mixture, and mix just until blended. Stir in walnuts and chocolate chunks. Drop by tablespoons (I use a small ice cream scoop) onto sheet pans, 2 inches apart. Bake  for 12-15 minutes. Adapted from At Blanchard's Table.

Note: Bake the cookies right after mixing. Do not refrigerate the dough, or cookies will come out poofy and cake-like. And if you're the type who likes that sort of thing, I don't wanna know about it.


Happy CCC Week!

2/11/11

I Love You More Than...

Bedtime came late one night, as my daughter Sam, and I, tried to top our love for one another.


Mom: "I love you more than all the South Sea pearls in the world."
Sam: "I love you more than ice cream."
Mom: "I love you more than all the stars in the sky."
Sam: "I love you more than...the septic system!"
Mom: "Wait—What!?"

Needless to say, this nightly ritual came to a screeching halt.

Moments later, the anxiety emanating from Sam's emerald green eyes turned to welcome relief, when, between suppressed giggles, she restored harmony to our universe, by saying,

"Mom! I meant to say, I love you more than (tee hee) the Solar System!"

Breathing a sigh of relief, I realized that, while I will never be perfect, being grouped into the human waste category, had never been one of my three wishes when I signed up for this job.

But that night, between gales of laughter, my precious pearl, Sam, left an indelible mark on my heart. She's all grown-up now. Yet, those carefree, wonderful moments we shared, time will never take away.

In any event, since most of her favorite desserts involve almond paste and chocolate, I dedicate this post to her. I hope you'll share this with the pearl of your life.


These cakes were baked in natural baking shells. If you do not have these, try Madeleine pans.  But try to find the natural shells, as you'll find many uses for them. I've baked everything in them, from brownies, shortbreads and cakes, to cornbread.


The following  recipe is the same I used for the seashell cookies some years ago—weelll, with a few minor changes, which  resulted in an even more pronounced almond flavor, and deliciously moist cakes.


To avoid confusion, I will post the recipe once again, to reflect those changes.


Almond Cakelets

1 cup (8 ounces) almond paste
1 cup sugar
1 cup butter, at room temperature
1 tablespoon vanilla extract
6 large eggs, room temperature
¾ cup AP flour
¾ teaspoon baking powder
¼ teaspoon salt

Preheat oven to 325º F. Grease and flour a 9-inch Springform pan or 16 baking shells*.

Combine the almond paste and sugar in a food processor. Pulse until blended. Add the butter and vanilla; pulse until well combined. Add the eggs, one at a time, and pulse until just combined. Do not over mix.

Sift together the flour, baking powder and salt. Add dry ingredients to the almond mixture and pulse to blend.

Transfer the batter to the prepared pan. Place the pan on a baking sheet and bake for 1 to 1½ hours in the Springform.
If making seashells,  bake  about 15 minutes, or until lightly golden around the edges.

Seashells were completely cooled. Then, lightly brushed with a  basic confectioner's glaze.

*NOTE: If you're left with extra batter, bake a few cupcakes, and freeze them for another time.

I made a sugar rose, and set it by the pearls. Pearls were basic chocolate truffles, covered in white chocolate. Don't hurt me. I just couldn't conceive using black (dark chocolate) pearls for this presentation.
So never fear. I have not converted to the light, fluffy side.


Happy Valentine's Day, my friends. And may Cupid's arrow set your heart aquiver!

12/3/10

A Tuscan Birthday Fare


Thumper's birthday was  weeks ago, but I had to share with you this milestone.
Although, the boy turned 12,  he's almost taller than me. And no longer shops for clothes in the boy's department. Fact is,  he's been recently spotted  wearing "man pants."

So, I was not too surprised when my suggestions for his birthday cake— a Star Wars theme, or perhaps, a Little Big Planet's Sackboy cake—were crushed.

"Mom, I don't want  cake—that's for babies. What I really want is Spaghetti and Meatballs!"

Say what?!

Have I spent all these years frolicking-in-sugar-in-order-to-someday-provide-my-kid-with-a-homemade-birthday-cake-for nothing? (comes up for air).

"Listen, Mister Man Pants, you're getting a cake, whether you like it or not!"

 
Being that my little guy is all grown up now, I honored his birthday wish—somewhat.  I baked him an old favorite  amongst his  peers,  Spaghetti Cake.

The cake was chocolate  (use your favorite chocolate cake recipe, or try this or this one.)
I baked it in an oval-shaped pan. The cake was  crumb-coated with a pale yellow-tinted buttercream. Then, the spaghetti strands were  piped from a #5 pastry tip.

I considered making truffles for the meatballs, but didn't think they'd  look realistic enough. Besides,  most kids  love Rice Krispies Treats, right?  So making  meatballs, using chocolate and rice cereal was a no-brainer.
Cake was garnished with fresh chocolate mint—Amore. The "tomato sauce" was   raspberry sauce.

Incidentally, in case you were wondering,  the wine  was for me—not the child.

Speaking of wine.  What would a traditional Tuscan fare be, without grapes? Which, btw, also happens to be the boy's  favorite fruit.


Well, I could've handed the boy a bunch of grapes, and called it a day.  But I wouldn't have slept through the night, unless I took the  fruit  to another level.
Concord Grape Sorbet was the answer  (Btw, leaves and tendrils were all made of Marzipan).

This frozen treat tastes like the grape juice many of us enjoyed as kids. Remember how it tasted purple?
Oh, you'll need a spoon for this one—or not—if you're a kid at heart.

I froze Concord grapes from last fall  for the occasion. Can't find Concord grapes? Make the sorbet with Concord grape juice. Can't find Concord grape juice? Use grape-flavored water. Can't find water?
...I'm way ahead of you...

Ain't I a stinker?

I'm kidding, of course. I just  think you should try this, sometime.

 Chocolate Rice Krispies Meatballs

3 tablespoons unsalted butter
3 ounces  unsweetened chocolate
1 package (10 oz., about 40) large marshmallows, or, 4 cups miniature  marshmallows
 6 cups Kellog's Rice Krispies cereal

In large saucepan melt butter and chocolate over low heat. Stir often.  Add marshmallows and stir until marshmallows are completely melted. Remove from heat.
Add 6 cups of the rice cereal, stirring  until well coated. Allow mixture to cool  about 10 minutes,  or until  cool enough to handle.  Roll meatballs from the chocolate mixture, using a small, greased,  ice cream scoop. Place ‘meatballs’ on  parchment paper-lined cookie sheet, and set aside until completely set.

 Concord Grape Sorbet

1½ pounds Concord grapes
¼ cup water
Simple syrup (recipe follows)
1½ tablespoons fresh lemon juice
 Prepare an ice bath, set aside. Wash and stem the grapes. Combine grapes  and water in a medium saucepan. Cook over medium-high heat, until the liquid begins to bubble and grapes start releasing their juices, about 5 minutes. Reduce heat, and simmer until grapes begin to break apart, about 3 minutes more.

Pass mixture through a food mill, or fine sieve into a large bowl set in the ice bath; discard solids.
Stir frequently, until completely cool. Stir in the simple syrup and the lemon juice.

Transfer mixture to an ice-cream maker, and freeze according to manufacturer's instructions. Place in an airtight container, and store in freezer until ready to serve, up to 2 weeks. Serves 10.

Simple Sorbet Syrup
Simple syrup can be stored in an airtight container in the refrigerator, for at least 2 months.

2/3 cup sugar
2/3 cup water
In a medium saucepan combine sugar and water. Bring to a boil, over medium-high heat. Cook until sugar completely dissolves, about 8 to10 minutes. Allow to cool, and then, refrigerate until needed. Sorbet recipe, courtesy of Martha Stewart.

Raspberry Sauce

One 10 ounce bag  frozen raspberries
¼ cup granulated sugar
1 teaspoon fresh lemon juice
1 tablespoon Chambord, optional

Bring raspberries, sugar, and lemon juice to a gentle boil. Simmer for 4 to 5 minutes. Remove from heat and add Chambord.
Purée in a blender until smooth. Strain mixture through a fine sieve to remove seeds. Cool completely, and refrigerate until needed. This sauce also freezes well.
_________________________________

And there you have it:

Thumper loves pasta.
Thumper loves meatballs.
Thumper loves Italian cuisine, in general.

So, what was my mercurial son's birthday dinner?

Chinese food.

10/29/10

Happy Halloween, my sweets!

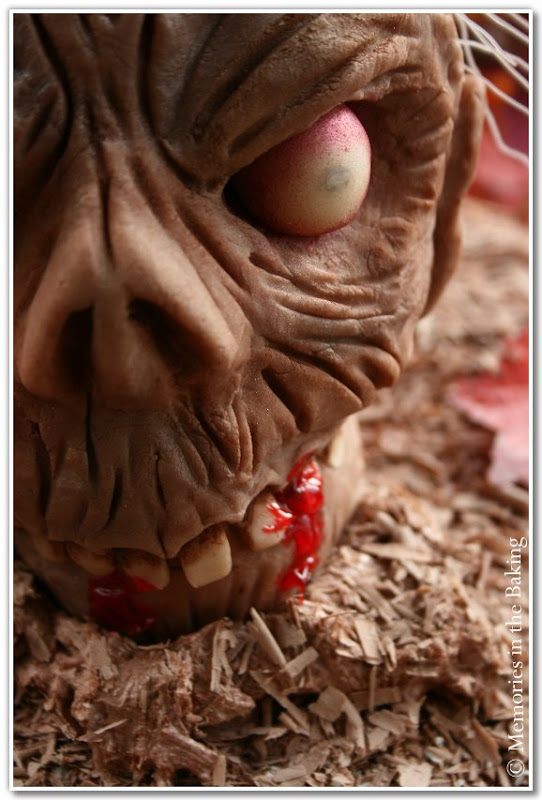
I'd like you to meet my friend, Rick O. Mortis.


Lately, he's been a little lonely—and dare I say—dead on his feet, since he bought the farm. So, I've asked him over...for dinner...
He's mortified at the prospect because he hit a dead-end, deciding what to bring to the fete. Silly stiff.

As you can tell, Rick is pretty down to earth. From his marzipan head to his fungus-y nails. You may think this is arcane, but I cannot wait to eat...er...I mean, meet him.

Mr. Mortis (whose only crime was being born [again] delicious), was molded from rice krispies treats.
If you make this, make sure the krispies treats mixture is cool enough to handle before shaping it into a skull. I usually wait between 8 to 10 minutes before handling the stuff.

For the head, shape the mixture into a rough oval. With your thumbs, make the impression for the eyes. And gently squeeze the head, just below the eyes, until it begins to look like a skull.
Looks a bit like Jay Leno, doesn't he?   Next time, I'll ease up on the chin.


Set the skull aside to dry,  by placing it on a plastic-covered bag of rice,  flour or confectioner's sugar to keep the shape of the head round.
If you skip this step, his head will be flat in back. Which will only make your zombie that much creepier.

In other words, let your fearless creativity flow, and quit hanging on to my every word!

Okay then. This is optional, but, color your marzipan with a few tablespoons of baking cocoa for that freshly-dug effect.   Roll out the marzipan, and drape it over the head. Quickly mold it to the shape of the head.
If it tears a bit, rejoice! 

Or, you could always patch it up—but not too much—because smooth, flawless skin is hardly prevalent with today's modern zombie.

Blood is piping gel,  tinted red.
From here on out, do as you please. Add as many, or as few, wrinkles, and teeth, as you dare.

The hair is Asian rice noodles, simply inserted into the skull, while marzipan is still soft and malleable.
Btw, remember to  lightly drape the areas you're not working on with plastic wrap, to keep marzipan from drying out, while you work.

The fingers were shaped freehand  into sausages,  again,  from marzipan. Pistachio halves were used for the nails. I wanted him pushing up daisies, but all I had were Brown-Eyed Susans,  which I made in sugar years ago. Somehow, the  Brown-Eyed Susans  seem  less morbid.  This suits my  friend Rick just fine. After all,  he's kind of an earthy,  happy-go-lucky zombie.  And you're jealous.


And just so you don't think I'm all about doom, gloom and despair, I present to you  this benign little witch, Evilene.


Evilene consists of three Jack be Little pumpkins, supported by toothpicks. She was then tarted up with a cute, sheet music hat.
The broom was haphazardly put together with a bunch of fresh thyme, tied to an artist's paint brush with twine. Easy, right? 

Well, my dear goblins, it is time for me to depart.

May you all rest in (Reese's) pieces this Halloween.

Regards,

Bad Brew Betty

2/12/10

Clementine Cake


At first I was afraid, I was petrified...when I learned of Nigella Lawson’s Clementine Cake, via the singing praises of her many fans.
To me, the idea of combining five, whole clementines with almond flour, seemed like a recipe for disaster.

The many hurrays (with only a few harrumphs) garnered by this cake over the years, finally convinced me to try it.

It was, with Open Arms, that I followed the lead of two culinary giants, Nigella Lawson, and Pierre Hermé, to create a festival of flavors in one dessert, lovingly concocted for the Wind Beneath my Wings.

Nigella’s book, How to Eat, describes this cake as "an easy to make, wonderfully-damp and aromatic flourless cake."
Hey, Two Out of Three Ain’t Bad.


The First Time I baked this cake, it turned out rather boring, unlike its lovely creator. Suspecting error on my part, I tried baking the cake again.
Surely a glug of Grand Marnier, a drape of chocolate ganache, and a supporting cast of delicately-crisp orange tuiles would be Almost Paradise.

Well, sadly, the cake never lived up to its superlatives. It was heavy, with a soggy texture, and it still lacked in flavor. A Total Eclipse of the Heart.

Btw, the reason I'm not including the recipe is because friends don't let other friends waste a perfectly good clementine. Not to mention, the recipe is all over the internet.

On the other hand, the Orange Tuiles from My Boo, Pierre Hermé, were light, citrus-y confections.


Only downside, the tuiles spread too much in the oven. And what started out as heart-shaped tuiles, emerged from the oven resembling the state of Mis . . . Mississip . . . Texas.

So, I had this brain flash to spread the tuile batter onto a parchment-lined baking sheet, and use a heart-shaped cookie cutter to cut out the tuiles as they came out of the oven.
Success! But I had to work quickly, while the tuiles were HOT! Ouch. Let me tell you, it was More Than a Feeling.

But, I Will Survive...

This experience was just a minute failure. And, for the record, I still love Nigella and Pierre. And I Would Do Anything For Love. But I Won't Do That . . .again.

The silver lining? This whimsical frog prince. He started with about 4 ounces of tinted marzipan. The body weighed almost 3 ounces, which left enough marzipan for the legs, feet and eyes.


Shape the largest piece into an oval for the body. Then gently roll the neck as shown, and prop the head on a sponge roller, for about 1 hour, to help maintain that pose.
Divide remaining marzipan (2 for the hind legs, 2 for the webbed feet, 2 for the front legs, and 2 for the eyes). Roll the two largest pieces into 2-inch long sausages, for the hind legs. Fold in half as pictured. Make the webbed feet, and front legs with the leftover marzipan.
With a wooden skewer, mark the nostrils. Attach all the pieces with edible glue made from Gum Arabic and a few drops of water. A mixture of powdered egg whites and water will work as well.

The crown was just a thin strip of gum paste, wrapped around my index finger, ends overlapped and glued. Painted gold using Gold Petal Dust, and a few drops of clear alcohol (gin, vodka, tequila), or lemon extract.


May your Valentine's Day be filled with chocolate, and favorite love songs.

1/15/10

I'm Seeing Red!

For those of you braving arctic temperatures, come right in and sit by the fire. How about a slice of cake, still warm from the oven—it is to live for!
Tea, perhaps?


For those of you living in a warm climate, get your dirty paws off the cake and get the hell out! And take your dark tan and flip flops with you too!


...well, if it looks like somebody woke up on the wrong side of the broom, it is because somebody did. It's that Old Man Winter again, having a negative effect on my alter ego. I think I she, should have some cake too.

And look, not even our normally placid Puddin' has been able to contain her displeasure. Smacking poor Louie, then drifting back to sleep, with the clear conscience of a cat.


So, it is with a bit of urgency that I contribute this wonderful little cake, notorious for putting a smile on all who try it.
The recipe evinces simple ingredients, harmoniously mingled together, to create a veritable masterpiece of flavors and textures. You'll be making this cake more than once. Yes, you will.

I know this, because it was voted Best in the Hemisphere by Thumper. And you all know how finicky he is. Never mind he has no idea what "hemisphere" means.

And so it is, with the approval of my adorable, little tax deduction, that I share this recipe with you.


Wintertime Cranberry and Orange Cake

Cranberry Filling:

12 oz. bag of fresh cranberries, picked over and rinsed
½ cup granulated sugar

Sponge Cake:

1¼ cups AP flour
1¾ teaspoons baking powder
¼ teaspoon salt
1¼ cups granulated sugar
¼ cup (½ stick) unsalted butter, melted and slightly cooled
2 large eggs, beaten
1/3 cup heavy cream
Grated zest of 1 orange
1 teaspoon vanilla extract

Topping:

1/3 cup sliced almonds
¼ cup granulated sugar

Preheat oven to 325°F. Grease an 8” Springform pan, dust the sides with granulated sugar, and line the bottom with parchment.

In a medium saucepan, heat the cranberries and sugar over medium heat. Stirring frequently, until the sugar dissolves and cranberries pop, about 15 minutes. Set aside to cool.

In a large mixing bowl, stir together the flour, 1¼ cups sugar, and baking powder.
Whisk in the melted butter, eggs, heavy cream, orange zest and vanilla in the same saucepan you melted the butter in. Stir into the dry ingredients until well combined.

Spread half the cake batter into the prepared pan. Spread the cranberry filling over the batter (don't let the cranberry filling touch the edge of the pan, or it will stick). Spread the remaining batter over the cranberries, and sprinkle evenly with the sliced almonds and remaining ¼ sugar.

Bake the cake until golden on top, about 1 hour. Let cool in the pan, about 10 minutes. Run a knife around the cake and release the sides of the Springform pan. Serve warm or at room temperature. Adapted from All American Desserts, by Judith M. Fertig.

Note: Did you know you can crystallize more than just fruits? Herbs, like rosemary, mint, and even bay leaves lend themselves to this simple technique. It's what I used on the frosty trim on the cake above, and the glass cloche below.
Start by whisking 1 tablespoon powdered egg whites with 2 tablespoons warm water. Brush egg white mixture to clean and dried herbs. Sprinkle with granulated sugar and set the herbs on parchment to dry. You could also add edible glitter to the sugar for a little extra sparkle.


And since we're crusading for World Peace, we might as well use up the rest of the cranberries, by making my favorite scones.


Excellent made with cranberries, red currants, and, of course, chocolate!


The ingredients are typical for scones. What is atypical is the technique, which consists of beating the heavy cream into soft peaks, making these scones featherlight, buttery, outstanding...and good too!


Cranberry Cream Scones

2 cups AP flour, plus more for dusting
1/3 cup sugar
3 teaspoons baking powder
¼ teaspoon salt
½ cup fresh cranberries
1 1/3 cups heavy cream
1 tablespoon melted butter
1 tablespoon granulated sugar*

Position the oven rack in the lower third of the oven. Preheat oven to 375°F.
Sift together flour, sugar, baking powder and salt. Mix the cranberries into the flour mixture.

Whip the heavy cream in a bowl until soft peaks form.

Fold the whipped cream into the dry ingredients, just until it forms a semi-cohesive mass.
Transfer the dough to a lightly floured surface and knead gently, a few times, until the dough holds together. With your hands, pat the dough into an 8-inch circle on a lined baking sheet. Brush scones with the butter and sprinkle with granulated sugar*

Cut circle into 10 wedges, without detaching them. And bake for 30-35 minutes or until golden. Cut into the pre-marked wedges after they're baked.

*This time I topped the scones with turbinado sugar.

By the way, if you'd rather make smaller scones, divide the doughy massacre in half, and pat each half into a circle. Proceed as above.


If this last photo of cranberry scones raised an eyebrow of suspicion, you've been paying attention. They're not cranberries, but red currants in them scones.

Warm wishes to my blogging brigade!

Broom-Hilda

12/16/09

National Chocolate-Covered Anything Day

Did the title make your toes curl?
Mine too!

And, thanks to other chocolate radicals out there, this is only one of many chocolate holidays celebrated throughout the year.

There's also National Chocolate Day, National Milk Chocolate Day, National Bittersweet Chocolate with Almonds Day, and National White Chocolate Day (seriously?), to name a few.

In any case, Marsha from Marsha-Kitchen is having a chocolate party, and you're all invited.


How many treats did I cover in chocolate, you ask? Well, uh...one.
I covered a single cake. Not too adventurous, true. But cake was what I craved at the time.


Besides, everything on the cake is chocolate. From the creamy ganache, and chocolate plastic bow, to the pine cone petals. Harmony is once again, restored to the universe, right?

The pine cone petals were made first, using dark chocolate, which was melted in the microwave, at 50% power, and stirred every 12 to 15 seconds.

Chocolate 'blobs' were smeared onto parchment paper, with the aid of an offset spatula. It took 10 ounces of chocolate, to cover the 9-inch cake halves.


I baked my favorite Almond Cake in a large, two-piece, egg-shaped pan.
Once cooled, I placed each half onto a cake board, and covered them with a whipped, dark chocolate ganache.
While the ganache was still soft, I placed the pine cone petals onto each cake, starting at the narrow end, and slightly overlapping each row, covering the entire cake.

The Chocolate Plastic Bow was made from a recipe I've shared on just about every cake decorating site on the interwebz, since 1995.

You may already have a recipe for chocolate plastic (which, btw, goes by many other names: chocolate clay, chocolate paper, chocolate paste, etc.), but this is the recipe I started using before dinosaurs roamed the earth, and it's always been very consistent. Give it a try.


Chocolate Plastic

1 lb. white, bittersweet, or semisweet chocolate
½ cup glucose
2 teaspoons ice water

Melt chocolate, stirring often. This can be done gently, in a microwave, at 50% power. Or, in a double boiler.
Once chocolate is melted, stir in glucose and mix in lightly. Add water. Stir again, until incorporated, but don't overmix. Spread chocolate mixture onto a plastic wrap-lined platter. Cover tightly, and allow mixture to ripen 8 hours, or overnight, until firm. Knead before using.
If the chocolate plastic sets too hard, soften it in the microwave, for only a few seconds at a time, until soft enough to knead. It should be very smooth and malleable.

The white chocolate paste can be tinted with paste, or powdered food coloring.

Note: I've always used Lindt Chocolate for chocolate plastic. But Callebaut, and even Baker's chocolate would be fine.

To make the bow, get some sponge curlers, like the ones your mom used to wear to bed every night. Remove the plastic clip, and use the sponges to support your chocolate bow, until completely set.

You can add interest to chocolate plastic by using textured rolling pins, available in cake decorating shops, or online.


For the tails, just roll out chocolate paste to 1/8 inch. If you like, place them on sponge rollers to shape, as pictured, or keep them flat.

What? Not enough love in my post?

Well here, stick your face in this...


And, if you're not a chocolate fan, well then, we just can't be friends. But I'll forgive you, and suggest you go to a teddy bear near you, and just squeeze.


The world may not be all sunshine and rainbows, but chocolate helps.

11/10/09

I Heart Oatmeal


T
he experts agree. A bowl of cooked oatmeal is a healthy, fiber-rich and cholesterol-lowering way to start your day.
The experts have also concluded that dark chocolate (as opposed to that icky, solid white substance that tries to pass itself off as chocolate) is loaded with powerful antioxidants.
It is instrumental in decreasing bad LDL cholesterol. And flavonol-rich dark chocolate promotes healthy blood flow, similar in effect to a low dose aspirin.

Got a headache? Have a chocolate chip cookie.
Got high cholesterol? Have an oatmeal, chocolate chip cookie.

And now—by the power infested in me—by the commonwealth of (Hershey) Pennsylvania, I give you my family's favorite recipe for chewy, oatmeal chocolate chunk cookies.


These may never win a beauty contest, but neither has Keith Richards, and look how popular he is. Buh-dum-chhh!
Forgive me Keith. Call me.

Chewy Oatmeal Chocolate Chunk Cookies

2¼ cups AP flour
1 teaspoon ground cinnamon
½ teaspoon salt
1½ teaspoons baking soda
¾ cup (1½ sticks) unsalted butter, softened
1 cup granulated sugar
½ cup light brown sugar
1 large egg
½ teaspoon vanilla extract
1/3 cup molasses
2 cups old-fashioned rolled oats
1½ cups semisweet chocolate chunks
1 cup chopped walnuts, optional

Preheat oven to 350°F.
Line sheet pans with parchment paper. In a bowl, whisk together the flour, cinnamon, salt and baking soda.
Using a mixer, cream the butter and both sugars, until light and fluffy. Add in the egg, vanilla extract and the molasses. Beat until blended.
With mixer on low, add the flour mixture, and beat just until blended. Stir in the oats, chocolate chunks, and walnuts, if using, until evenly distributed.
Drop the dough by tablespoons onto prepared sheet pans, about 2" apart. Bake about 10 to 12 minutes. Yield: 5 dozen cookies.


~~~~~~~~~~~~~~~~~~~~~~~~~~~~~~~~~~


And because I got your back, here is another wonderful cookie recipe for you. This one comes from my friend Sharon, whose blog is like taking a trip to the beautiful Canary Islands, but cheaper than airline tickets and hotels.

Only changes I made to Sharon's recipe were to substitute butter for the margarine, because butter is what I always have on hand. And using chopped walnuts, instead of raisins, because my ball and chain dislikes them.


Willow's Glazed Apple Cookies

Cookies:

½ cup soft margarine
¾ cup brown sugar
1 egg
1 teaspoon cinnamon
½ teaspoon cloves
2 cups AP flour
½ teaspoon baking powder
1 teaspoon baking soda
½ cup chopped nuts (optional)
½ teaspoon salt
2 peeled and grated, medium size, Granny Smith apples
1 cup chopped raisins
¼ cup milk

Glaze:
1½ cups icing sugar
1 tablespoon soft butter
dash of vanilla
pinch of salt
dash of cinnamon
2 - 3 tablespoons of heavy cream

Stir well to make a very soft but not runny icing.

Preheat oven to 375°F. Cream margarine with sugar . Add egg and spices. Beat until well blended.
Add apples and milk.
Sift together the dry ingredients adding raisins and nuts, if using.
Add dry ingredients to creamed mixture and stir well until blended.
Drop by tablespoons onto greased cookie sheets, 2” apart.
Bake 13 - 14 minutes. Transfer cookies to wire rack and cool approximately 10 minutes. Glaze while cookies are still warm.


Enjoy my friends. And I'll see you in health.

10/31/09

A Tale of Two Sillies

6:55 p.m. There was a chill in the country air, as a boy and his father eagerly walk out the back door of the old farmhouse, and into All Hallows’ Eve.

Playfully kicking little piles of crisp, fallen leaves, they make their way to a small tent they had set up in the woods just days before.

7:00 p.m. The boys reach their tent. A structure of cheap polyester was all that stood between them and the rapacious creatures that thrive when the sun goes down.

The autumn wind whistled through the tent, persuading them to gather kindling to build a fire, all the while anticipating a modest feast of s’mores and hot dogs stashed in their backpacks.

7:23 p.m. Pandemonium brakes out in the tent.

“A stuuunk! It’s a stunk!” the young boy screams.
("Stunk" being the boy's term for Skunk)

Without hesitation, the boys ripped through the flap of their tent, making a bee-line for home. And leaving a trail of marshmallows back to reality.

Perhaps I should mention (with devastating sarcasm) the tent stood only 23 feet from home.

What a pity. Of all the wild critters in the woods, the guys became unhinged by a certain Peppi Le Pew, hell-bent on crashing their garden party.

Based on a true story.

~~~~~~~~~~~~~~~~~~~~~~~~~~~~~~~~~~~~~~~~~~~~~~~~~~~~~~


Well, would you look at the time! I can't end our visit without sharing what I made for the two brave male characters in the story.


Say hello to Steampunk Jack. Thanks to my daughter for the steampunk idea.
Jack was baked in two 6” in diameter half ball pans (You could use mixing bowls for this).
I have only two favorite chocolate cake recipes—this is one of them—appropriately named,

Ultimate Chocolate Cake.

4 ounces unsweetened chocolate
1 cup (2 sticks) unsalted butter
2 1/3 cups firmly packed light brown sugar
3 large eggs
2 1/3 cups sifted cake flour
2 teaspoons baking soda
1 teaspoon salt
2/3 cup buttermilk
1 cup boiling water
1 teaspoon vanilla extract

Heat oven to 350°F.
Grease and line bottoms of two 9" cake pans with parchment paper (I used the ball pans mentioned earlier, with enough batter left over to fill a mini loaf pan).

Melt chocolate in the top of a double boiler (or in a microwave on High, stirring every 10 to 15 seconds). Allow chocolate to cool.
Cream together butter and sugar. Beat in eggs, one at a time. Mix in melted chocolate.

Sift together flour, baking soda and salt, and add gradually to chocolate mixture, alternating with buttermilk. Stir in boiling water and vanilla. Pour batter into prepared cake pans.
Bake for 30 minutes or until a cake tester comes out clean. Cool for several minutes in the pans. Invert onto a wire rack to cool. Slightly adapted from a recipe by aunt Martha Stewart~


Steampunk Stylin' Jack

I sliced each half to create 4 layers. Then filled with chocolate ganache. Even though the cake was small I inserted couple of wooden skewers through its mangy little head and into the cake board for stability.

The cake was iced thinly, and allowed to set until no longer sticky to the touch. If you'd rather not wait, refrigerate the cake until buttercream is firm.

Tinted rolled fondant went on the cake next. Indentations on the pumpkin were made with a chopstick, but a skewer works too. Be sure to do this while the fondant is still soft. The white rolled fondant collar and bowtie were added last.


Jack's top hat was made of pastillage because this medium dries faster and harder than gum paste. But I also recommend it because it is made with ingredients already in your cupboard.

Pastillage

1 tablespoon gelatin
1/3 cup water
4 cups confectioner's sugar (lightly spooned into cup)
1/2 cup cornstarch (lightly spooned into cup)
1 pinch cream of tartar
food coloring (optional)

Sprinkle the gelatin over water in a small heatproof glass cup. Allow to sit for 5 minutes. Set in a small pan of simmering water, stirring until gelatin is dissolved. (This can be done in a microwave on high power for a few seconds). Remove from heat.

Combine the sugar, cornstarch and cream or tartar in a large bowl. Make a well in the center. Stir in the gelatin mixture until blended. Mix with lightly greased hands and knead until sugar is incorporated.

Turn onto a smooth, lightly greased surface and knead until smooth. If pastillage seems dry, knead in a few drops of water. If too sticky, knead in more confectioner's sugar~

Allow pastillage to rest for at least 1 hour before using. To prevent it from drying out, keep it tightly wrapped in plastic, and place in an airtight container.
Store 1 month at room temperature, or freeze indefinitely.
Recipe: The Cake Bible, by Rose Levy Beranbaum.


Instructions for Top Hat

An empty tin can, covered in plastic wrap and well dusted with cornstarch, was used to shape the top hat.
Roll out your pastillage to about 1/8-inch thick. Using the tin as a guide, cut out the top of the hat. Next, measure the tin's circumference (adding ½-inch to the length), cut out the strip for what will be the side of the hat.

Wrap the pastillage strip around the tin. For a clean cut, overlap the ends, and cut through all layers with an X-acto knife. Lightly dampen the ends to secure. Set on a cornstarch dusted tray to dry, while you make the brim.

Follow the same steps for the brim that you used to make the top of the hat. But add an extra 2 to 2½ inches. AND, poke a hole in the center of the brim with a wooden skewer. Allow the top and brim to dry completely, before gluing together.

What to use for glue?

No, not royal icing. Instead, dissolve a small ball of pastillage by adding a few drops of water at a time, until it is the consistency of Elmer's glue. Attach by brushing this glue on all the edges. Set aside to dry.

Take a toothpick or wooden skewer (depending on the size of your cake), insert it halfway into the top of the cake, wherever you want to position the hat. Slide the skewer through the hole in the hat, to securely anchor the hat to Jack's head.

The word, Boo, was handpainted with paste food color thinned with vodka.


Well my friends, the bewitching hour is upon us...


The stunk and I wish you a Happy Halloween!

2/11/09

Valentine's Day is nearly upon us...


...and life has been frantically looking for me, trying to keep me busy, trying to keep me from blogging, and trying to keep me from hanging out with you guys.
Quick, hide me!
Why not go after the likes of Gary Busey? Now, there's a character who should never be left unsupervised.

Speaking of being left unsupervised, I've been happily tasting some of the chocolate treats I've made for the upcoming, romantic event. It's okay. I eat chocolate strictly for the antioxidants. Doesn't everybody?


Uh-oh. I'm having a romantic interlude with Valentino and some tango theme music. Please hold.


Oh, how I would've loved to've shown him something in a size ME.
Let it be known, I'm happily married. But, it's Rudolph Valentino who comes to mind on V-day. He was so incredibly gorgeous, with his masculine, chiseled good looks that, given the opportunity, I would've boiled his boxers and headdress to make tea.

Okay, fantasy trip is coming in for a landing. Crash.

Anyway, so far, I’ve baked a cake, I’ve molded chocolates, and I've also made a batch of my favorite brownies.


And, I figured, if a little chocolate is good for me, then a lot of chocolate must be better, right? Okay. So I glazed these fudgy little bites with more chocolate.


Overkill? Nonsense! As Moliere once said, “We die only once, and for such a looooong time.”


Btw, fondant wings were attached to the back of the hearts with a dot of royal icing. Melted chocolate would also work, but it will take longer to set up.

For the topiary cake, I made the flower pot using my sour cream pound cake recipe, which were baked in 3 8-inch square pans, instead of a Bundt pan. The topiary heart was made by tinting half a recipe of Rice Krispies treats dark green, and shaping it into a heart while mixture was still warm. You can do this by hand, or you can pack the mixture into a small heart-shaped pan and pop it out the pan onto parchment paper, but, leave the heart uncovered while it cools.


I wanted the topiary to have the look of ivy, so instead of rice krispies, I used corn flakes.

But, for a mossy look, rice krispies would be ideal. And, while still warm, I pushed two wooden skewers through the bottom of the heart, to insert into the cake later.
This is also important, I used a bit less than half of the rice krispies treats mixture. This kept the heart from being too top heavy. So keep that in mind, if you try this.

The cake was covered in vanilla buttercream. The roses, leaves, butterfly and ribbons were all made of gum paste.

If you’re short on time, but still want to make something that will impress your sweet Valentine, get yourself a pretty candy mold and mold your own chocolates. This is quick, and if you can melt chocolate, infallible.
Gild the lily by dusting your molded chocolates with edible gold luster dust.


Don't you love that pink glass heart? It's a vintage little box by Fenton. So dainty and feminine, unlike me. Maybe that's why I love it.

Here are the recipes used for the cake, as well as the brownies.


Sour Cream Pound Cake

1 cup unsalted butter
3 cups granulated sugar
6 large eggs
3 cups cake flour
½ teaspoon salt
¼ teaspoon baking soda
8 ounces sour cream
1 tablespoon vanilla extract

Preheat oven to 325°F. Cream butter and sugar until light, 5-7 minutes. Add eggs, one at a time, beating well after each addition. Sift flour, baking soda and salt. Add flour mixture and sour cream, alternately to creamed mixture (beginning and ending with flour mixture) Beat after each addition, Add vanilla extract. Pour in prepared Bundt pan*, and bake for 1 hour and 20 minutes.

*I used 3 8-inch square pans, which were parchment paper lined.


Supernatural Brownies.

16 tablespoons (2 sticks) unsalted butter
8 ounces bittersweet or semisweet chocolate, cut into 1/4-inch pieces
4 large eggs
1/2 teaspoon salt
1 cup granulated sugar
1 cup firmly packed dark brown sugar
1 teaspoon instant espresso (I used Medaglia D’oro)
1 tablespoon vanilla extract
1 cup all-purpose flour
1 cup chopped walnuts or pecans, optional

One 13 x 9 x 2-inch pan, buttered and lined with buttered parchment.

1. Set a rack at the middle level of the oven and preheat to 350°F.

2. Bring a saucepan of water to a boil and turn off heat. Combine butter and chocolate in a heatproof bowl and set over pan of water. Stir occasionally until melted.

3. Whisk eggs together in a large bowl, then whisk in salt, sugars, instant espresso and vanilla. Stir in chocolate and butter mixture, then fold in flour. Add the chopped nuts last, if using.

4. Pour batter into prepared pan and spread evenly. Bake for about 30-35 minutes, until top has formed a shiny crust and batter is moderately firm. Cool in pan on a rack. Wrap pan in plastic wrap and keep at room temperature overnight.

5. To cut brownies, unmold onto a cutting board, remove paper, and replace with another cutting board. Turn cake right side up. Cut brownies into 2-inch squares. Makes twenty-four brownies. Adapted from Nick Malgieri's Chocolate.

The brownie hearts were glazed with, what else, more chocolate. Oh, like you weren't thinking it.
It's a well-known fact that I can't function without chocolate. I'd rather share a needle with Amy Winehouse and bid adieu to this cruel world than live without chocolate. So, yeah, you could say I like the stuff.


As for the paper roses, well, most of you know, I was not blessed with a green thumb, so I've compensated over the years, by making my own roses from mediums such as gumpaste, marzipan, buttercream and even chocolate clay.

But, check this out! I made Paper Roses (cue Marie Osmond's song).


I had a stack of sheet music I just couldn't part with, but I didn't know what to do with it either. Then, I remembered my mom showing me how to make crepe paper roses when I was a kid. And a new use for sheet music was born!
I'm so tickled with this new project. I also made roses using coffee filters (see white rose above). I could've tinted the petals, but, I sort of liked it plain.

These roses I give to you, my dear friends...


And may you all get poked by Cupid's arrow this Valentine's Day!
"I know I'm looking forward to getting poked." that's what she said.